Wednesday 10 August 2011

How to Create Your Own Photoshop Brush Sets


Photoshop brushes are without a doubt the salt of every design project. Designers are using them all the time to create awesome graphics. I actually can't imagine Photoshop without its brushes, because are so easy to use and results are trully fantastic.

Although there are enough brush sets on the internet, maybe not all fits your needs.In this case you're obliged to create your own brushes or brush sets.

In the next steps, I'm going to show you how you can easily create your own brush sets using basic Photoshop tools and brush options.

Before we begin some things should be clarified. Photoshop has some rules regarding tools and the Brush Tool is not an exception:

Photoshop is limiting brush dimensions to a maximum of 2500 pixels in height and width (smaller dimensions in older versions of Photoshop). It's better to create large brushes up to 2500x2500px in order to obtain good results. Using brushes with bigger diameters than the original one will blur the image.

If you saw the Brush Preset Picker already(and I'm sure you did) you noticed that all the brush thumbnails are black. If you want to create a brush using different colors, when converting the design to brush, black becomes opaque, all the colors will become translucent(opacity between 0 and 100%) and white will become transparent(0%). So it is better to convert your document to Grayscale to have a better idea about what you're doing.

Enough talking, let's build some brushes. As usually, open Photoshop and create a new document. I'll use a canvas size of 600x600px to offer you high-quality images and not resized ones. I'm suggesting you to set the canvas size up to 2500x2500px. Paint the empty canvas with white or leave it transparent, is your call. I made it white.

The brush I want to make will imitate a nice bokeh effect which can be applied on your photos. Grab the Brush Tool(B), go to Window - Brushes or simply press F5 to open the Brushes panel and choose the Hard Round(19px) brush.

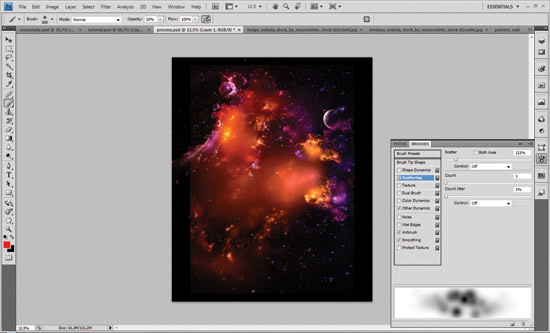
Next, we're going to apply some options to our brush, like Shape Dynamics, Scattering and other dynamics.

Shape Dynamics: Increase the Size Jitter to 75%.

Scattering: Increase the Scatter to 1000% and Count Jitter to 100%.

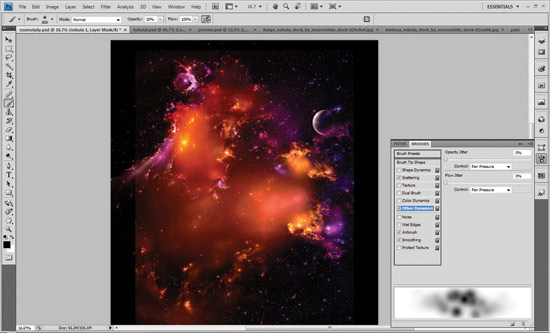
Other Dynamics: Increase the Opacity Jitter to 50% and the Flow Jitter to 75%. The preview area shows you how the brush will look like.

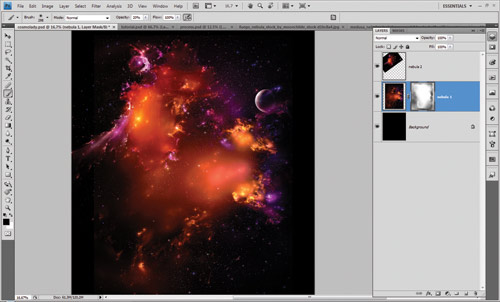
Now that we've set the options, choose black color and start painting. If you feel that the diameter is too small or the bubbles are too close one to each other, you can increase them from Brush Tip Shape panel.

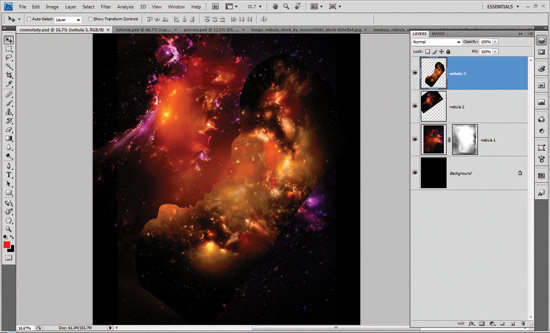
The bubbles painted on the margins are exceeding the canvas and is better to erase them. Grab the Eraser Tool(E) and erase them so you have only rounded bubble inside the document.

To convert the document into a brush, go to Edit - Define Brush Preset, give it a name and hit ok.

If you go into the Brush Breset Picker, the brush you've just created has been added to the rest of the brushes.

Now create a new brush following the steps above. Then go to Edit - Preset Manager and select Brushes as the preset type. At the bottom and you'll find the brushes that we've just created. Select them both and hit "Save Set". Then give the brush pack a name and save it as an .abr file. You can now easily load this brush set any time, and it can also be distributed to others. Congratulations, you have just created your own custom Photoshop Brush Set.

I thank you for reading this tutorial and if you have any questions, drop us a comment below!


Photoshop Tutorial: Beginner Layers

Photoshop CS3 Tutorial: Layers for Beginners(Video Tutorial)

Create a Nebula Cosmolady in Photoshop Tutorial

Final Image

Img

Step 1.)

Let start opening a new 300 DPI file on 4200px x 5100px. We will use beautiful Cosmo and Nebulas Pictures provide to us by

http://moonchilde-stock.deviantart.com/

Img

Img

Step 2.)
We will add more lightning and turn our galaxies into a dramatic mood. By using levels (Cmd/Ctrl + L) with this settings (9 - 1,00 - 255), and change the blending mode to screen.

Img

Step 3.)
To blend our pictures edges with the background pick the 200px brush make a layer mask on the layer we are working on and open the brush engine. Set the scattering 121% and set the control off, count - 1, count jitter - 1%.

Img

Img

Step 4.)
Go to the layer mask and paint with black in 20% of brush opacity the edges of the bottom image to blend it with our black background.

Img

Step 5.)
Add 2 more nebula pictures on the top of layers and repeat the 3 last steps.

Img

Img

Step 6.)
Now Select all (Cmd/Ctrl + A) and (Cmd/Ctrl+Shift + C) and Paste on the top of layers, set the blending mode to screen and make a layer mask and fill it with black.

Img

Step 7.)
By using 100px round brush (this brush size can change depending on the area you are revealing) on 20% brush opacity star painting and revealing our highlights as you in the screenshot.

Img

Step 8.)
Duplicate the layer and delete the layer mask and set the blending mode to normal. Go to filter - Other - High Pass with 6, 0 Radius. Set this layer to overlay.

Img

Step 9.)
With the High Pass layer we want to make more brightness on our picture, so use the Dodge tool with the highlights setting in 12% and 182px brush size and start painting the highlights areas (this brush size can change depending on the area you are revealing).

Img

Img

Step 10.)
Go to Adjustment layers and add Hue Saturation bring the picture some new colors. You can achieve this by using the same techniques of brushes and layer masks. Use the colors you like most and play around with different adjustment layers.

Img

Img

Step 11.)
On this step you need to go to

http://www.istockphoto.com/stock-photo-3382925-aviator-helmet-girl

and buy the girl picture or use another picture if you want.

Img

Step 12.)
Next go to Hue/Saturation (Cmd/Ctrl + U) and apply the screenshot settings. The use the Fade Control (Cmd/Ctrl + F) and apply the screenshot settings. Repeat this step and pick some color of the picture.

Img

Img

Img

Step 13.)
Then go to Filter - Sharpen - Unsharpmask and use the screenshot settings.

Img

Step 14.)
Duplicate the layer and apply the High Pass effect and use the same techniques of the step 8.

Img

Img

Step 15.)
In this steps we going to crop the lens glasses with the pen tool and fill them with the part of the background to create a reflection. Take care with the lightning in the scene and make the shine with the gradient tool.

Img

Img

Img

Step 16.)
Add a new one Hue/Saturation adjustment layer and fill the mask with black and start revealing the new color on the areas you see in the screenshot to make a good integration with the background.

Img

Step 17.)
Add some flares in areas of the girl with different brushes sizes.

Img

Img

Step 18.)
Now go to Image - Duplicate the File to start working just with the girl. Delete the nebulas background and merge all girl layers (Cmd/Ctrl+E) and let start to create some shapes to cut off the holes. Use the pen tool to do the shapes.

Img

Step 19.)
Using the Pen Tool make a path, convert to selection, and fill it with black to make the black hole on the girl arm.

Img

Img

Step 20.)
Then use the same Selection to duplicate the Shape of the girl arm using (Cmd+Ctrl + J) put this layer on the top and go to Edit - Free Transform and move your anchor point to the left bottom and move your Arm Shape some grades to the right.

Img

Step 21.)
Over again use the path and repeat the Selection step and Select go to Select - Modify - Contract and use the screenshot settings. Here we are going to create the Hole Edges.

Img

Step 22.)
Use the Dodge tool and Burn tool to add the highlights and shadows on the hole edges and add more details painting the areas where you need more shadows or highlights.

Img

Img

Step 23.)
We need to add some shadows in the bottom of the arm shape to integrate it with the whole picture. Check out our screenshots

Img

Img

Img

Img

Step 24.)
Repeat the 19 to 22 steps to create more holes in the girl body.

Img

Step 25.)
Add some more depth to the girl photo. Make 4 adjustment curves layers (2 for shades, 1 for highlights and 1 for eyes color) repeat the same techniques of layer mask and brush painting.

Img

Img

Img

Img

Step 26.)
Then add some flares using the brush tool with different sizes.

Img

Step 27.)

Change the blending mode to screen and the selection and transform tools to make each spark larger.

Img

Step 28.)
Next we add color lights with different brushes sizes and screen blending mode.

Img

Step 29.)
In this step we going to add some dynamic lines and gradients. Pick the rectangular marquee tool and fill your selection with different color gradients, as you see on the screenshot.

Img

Step 30.)
Lets add the 3d models we provide in this tutorial. Pay close attention to lightning on your scene and use the different mask, curves and brush techniques you learned, to integrate the 3d.

Img

Img

Step 31.)
To create more depth lets add a bigger 3d model in front of our artwork, and with lasso tool select the closer part of the render and go to Select - Feather - 30%, then go to Filter - Blur - Motion Blur - Angle 79 - Distance 10px. This will create a depth of field sense.

Img

Step 32.)
Now we will turn the colors to a vintage look, adding curves as you see in the picture.

Img

Img

Img

Step 33.)
Finally, we duplicate the artwork an go to Filter- Stylize-Glowing edges. And use the settings on the screenshot. The change the blending mode to soft light and the opacity to 45% and that's all folks.

Img

Img

Final Image

Img